Home > Introducing Cority > Getting Started with Cority > Running the Program
You can run unlimited concurrent sessions of the Cority application unless your administrator has limited this setting.
After logging in to the Cority application, you see the Cority suites across the top (or down the left side, depending on the interface theme you have chosen) and the Employee List open (or whichever option has been specified to open by default using the menu configuration, such as the Dashboard (for information about using the Dashboard, see Using the Dashboards). You may see a message from your Administrator at the bottom; depending on the settings for this message, it may be shown once, remain open at all times, or remain open until you close it.
Cority modules are grouped into suites (Occupational Health, Safety, Ergonomics, Industrial Hygiene, Environmental, Business Intelligence, and Training). The most common function, Demographics (the employee list), is in the My Favorites menu. You can configure your My Favorites menu to add other functions that you use frequently. When you click on a suite, its menu opens. The right side of the screen will show whatever form is needed for the chosen function or module.
At the top left of each form layout is a breadcrumb trail of the navigation to the layout in the format: <module name> / <record name> / <tab name>. Each location in the breadcrumbs is a clickable link. If you click one of the links, you will be directed to that location. When you close the record or click an item in the left menu, the breadcrumbs will be cleared.
The Administrator functions are documented in Administrator Functions.
All users must be entered in the Users table (see Setting Up Users) and this is where they are assigned their functional classifications in the application (i.e. Practitioner, Auditor, Safety Representative, Scheduling User, IH User, etc). A user’s functional classifications determine which User picklists they will appear in. For example, all Practitioner picklists will point to the User table but only display users who are classified as a “Practitioner”. The Users table is also where a user can be granted security roles and can be linked to health centers (if they are classified as a Practitioner).
All Cority modules will be displayed, but you will receive a message if you try to access an unlicensed module.
Cority provides several user interface themes, which you choose in the “Application User Interface Themes” system setting:
Classic
Classic (High Contrast) - uses WCAG/Section 508 color contrast standards
Modern - displays a customizable home page dashboard and updated styling for list views, layouts, menus, buttons, etc.
Clarity - displays a customizable home page dashboard and updated styling for list views, layouts, menus, buttons, etc. and is also WCAG/Section 508 compliant. When using this theme, an administrator may use the “Title Bar Colors” system setting to change the color of the Cority header background, text and icons.
You may need to refresh your display to see the change.
Use of the Modern theme requires Advanced Dashboard permissions. The home page displays the advanced dashboard that is pinned in the Advanced Dashboard module; if none is pinned, the first view created is displayed. For more information, see Using the Advanced Dashboard.
In your settings, select the Language that you want to work in. All Cority forms and field labels are translated into that language.
Customizing Field Label Translations
If you have appropriate permissions, you can enable Translation Mode and change field labels directly on layouts.
Make sure the Google (or Microsoft) Translate API Key is recorded in the system setting of the same name, the “Translation API Tool” system setting is set to Google or Microsoft as appropriate, and that the “Enable Translation Mode” system setting is selected.
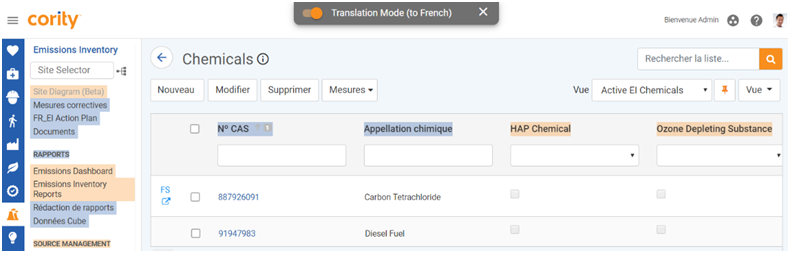
When Translation Mode is enabled, you will see a Translation Mode toggle at the top of the screen. The ‘to’ language will be the language code defined on the Language look-up table that corresponds to the preferred language specified in your user settings. You can click the X to hide the toggle, which will reappear the next time you log in.

When you turn the toggle on, translatable field labels will be highlighted in orange, and any labels that have already been translated will be highlighted in blue.
Right-click on a translatable field and either enter your own translation, or use the Google (or Microsoft) suggestion. The Base Text displays the original label as defined on the layout.
While in Translation Mode, you can access your browser's right-click options by right-clicking any non-highlighted area of the interface.
Click Apply. The translated label will now be highlighted in blue. The translation is retained even if you turn off Translation Mode.
Translating Field Values
If the “Enable Translatable Free Text Fields” system setting is turned on, you can translate any text field values that were previously entered in a different language. Any text fields that can be translated are identified with the icon:
icon:
Right-click on the text field and choose Translate into <language>. The field text is translated to your local language and becomes read-only. You can click into the field to see the original text and edit if necessary. When you click away again, text reverts to the read-only translation.
To customize which menu sections are shown, their order, and which items are included in the My Favorites menu, click Personalize this menu (at the far right of the menu toolbar).
Each menu category has a check box. You can hide entire suites or select modules or functions to include or exclude in the menu. For example, if you are solely an Occupational Health user, you can exclude the other suite menus entirely. Click and drag suites, or sections or modules within a suite, to the order that suits you (you cannot move modules between suites).
Similarly, you can add frequently used functions from other modules to your My Favorites menu. Your administrator may also configure some standard list views or shared dashboards to be available to add to your Favorites menu. The My Favorites menu opens when you login, so having your most used functions there ensures speedy access. Note that this just creates additional access; the function will still be available from its original menu as well. To add a function to your My Favorites menu, drag it from its normal location in one of the suites. If you drag a function that is listed in multiple suites, e.g. Audits, the function in the My Favorites menu will be prefaced with the original suite name, e.g. Safety-Audits, Ergonomics-Audits, etc.
When you login the system opens to the Employee List by default. If you remove Demographics from your My Favorites menu, the system will open the list of the first item in the next menu. Alternatively, in the Menu Configuration, you can select which menu option you want to open by default when logging in to the application.
Make any changes according to how you want your menus set up, then click Save. To return to the default menu set for your user profile, click Restore Profile Menu Configuration.
An administrator can view and edit users’ menu configurations; see Managing Menu Configurations.
If there are external web sites that you frequently refer to, you can add a link directly to your menu. Add the URLs to the section at the bottom of the form. These URLs will be listed under Links in the menu toolbar.
Each time you open a record related to an employee, you will see a floating banner above the form that displays the employee’s demographic information, optionally including any active allergies.
To configure the information displayed in the banner, click the sprocket in the upper right corner.
To hide (or show) the banner, click the arrow at the bottom of the banner.
