With this in mind, either:
-
In the Industrial Hygiene menu, click Monitoring, retrieve the sample, and go to the Agents tab;
or -
In the Industrial Hygiene menu, click Lab Requisition, and open the appropriate requisition number. On the Samples tab, click the appropriate sample, then when the sample record opens, go to the Agents tab.
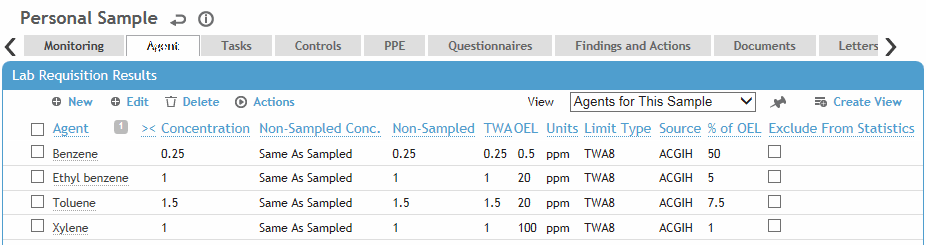
On the Agents tab of the sample record, click the link for the agent you want to enter results for.
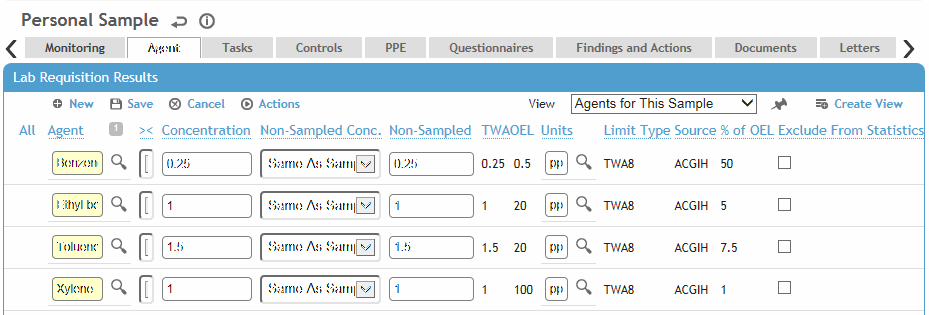
If there are multiple agents to enter results for, select the agents and click Edit to quickly enter the results on the same screen, instead of opening each agent record separately.
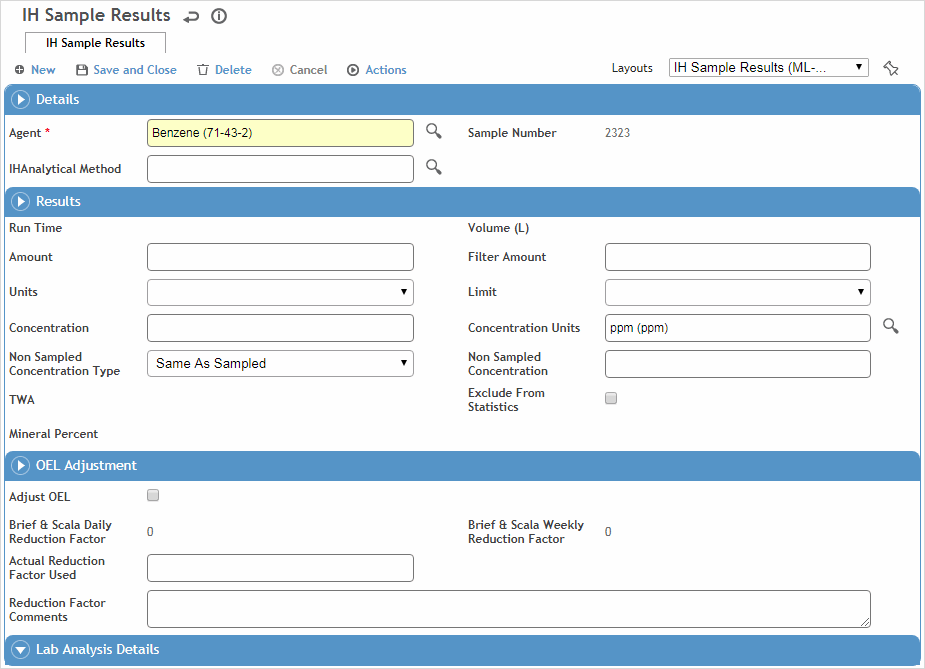
Select the Analytical Method and enter a description. A default method may have been defined in the IHAnalyticalMethod or AgentHazard table, but you can override it with another method defined for this agent.
Depending on your system settings, some lists may be filtered based on other choices. For example, if Filter analytical method by agent is selected in the system settings, when you choose an analytical method for a particular agent, only the methods associated with that agent are available to choose from. These links are defined in other look-up tables (IHAnalyticalMethod, IHCollectionMedia, IHLabMethodMedia, and AgentHazard).
Enter the Amount and select the conversion Units to automatically convert the amount to a concentration and calculate the TWA. In IH reports, the following units are converted to the default units in the AgentHazard look-up table: ppm, mg/m3, and ug/m3.
In the Limit field, enter the value if the results are less than measurable.
In the Non-Sampled Concentration field, if the concentration for the non-sampled period is known, select “Other” and enter the concentration to be used in calculating the TWA (for example, the concentration in a lunch room that was previously sampled). Otherwise select “Same as Sampled” or “0”.
For linked samples, enter the Concentration and Non-Sampled Concentration for all substances in the master sample and any linked samples. The TWA field in the master sample will display the combined TWA of the master and all linked samples. The TWA field in the linked (non-master) samples display their individually calculated TWA.
Laboratory users do not have access to the Non-Sampled fields.
If you selected “F” in the Units field, additional fields are available (# of Fields, Filter Area, and Mic. Area) to enter the number of fibres found in the monitoring sample.
An adjusted occupational exposure limit (OEL) can be calculated manually, or automatically based on the Brief and Scala model or the Quebec model. The factors are based on the following periods of time:
-
Brief & Scala Daily - based on the hours per day (shift length) defined on the Monitoring tab
-
Brief & Scala Weekly - based on the hours per week defined on the Monitoring tab
-
Quebec Daily Reduction Factor - based on an 8-hour shift
-
Quebec Weekly Reduction Factor - based on a 40-hour work week.
To adjust the calculated OEL manually, select the Adjust OEL check box and enter the Reduction Factor to be used (must be between 0 and 1) and any Comments. An asterisk will appear in the Agent tab beside the OEL figure to indicate that it has been adjusted.
To adjust the OEL automatically, you must ensure the following custom configuration:
-
AgentHazard look-up table: add the OEL Auto-Adjustment field to the agent layout and, for each agent, set it to a calculation method other than “None”.
-
IH Sample Results layout: if any agents use one of the Quebec calculation models, add the associated Quebec [Daily/Weekly] Reduction Factor field.
If set up to adjust automatically, the appropriate adjustment factor will be displayed and the OEL will be adjusted according to that factor (if the factor is less than 1, it will be followed by an asterisk).
The lab information is populated from the lab interface. It is read-only if the Laboratory Interface check box is selected in the Laboratory look-up table. This section is not available if this is a direct reading sample.
Click Save.