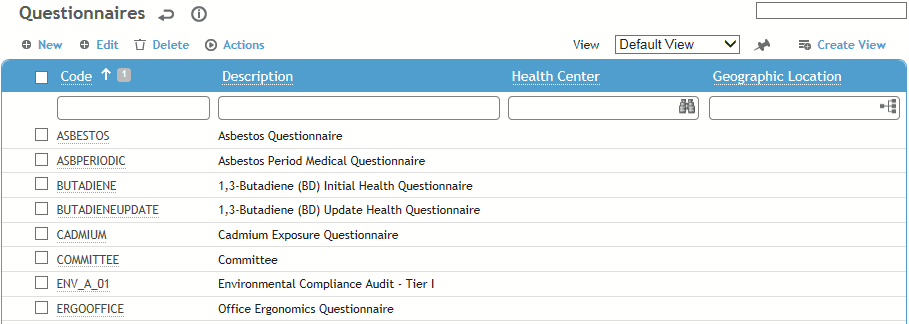
To filter the list of records, enter a few characters in one or more of the fields at the top followed by an asterisk, then press enter.

Click a link to edit a questionnaire, or click New.

To create a questionnaire that is very similar to an existing one, select the questionnaire and choose Actions»Clone. All questions and configuration are copied to the new questionnaire; edit it as required.
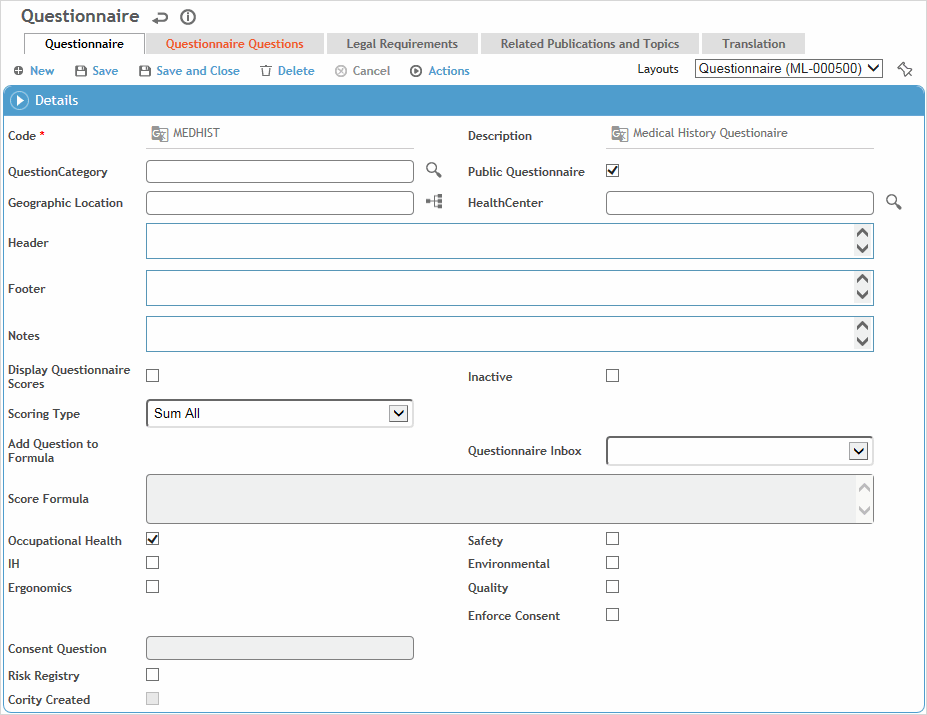
On the Questionnaire tab, enter information about the questionnaire as a whole:
Enter a Code and Description for the questionnaire.
Select a Category to filter the Available Questions list.
Indicate if this questionnaire will be available in myCority or on the Public Questionnaire site.
If necessary, select the Geographic Location and/or Health Center to limit the questionnaire to.
To have picklists for this table only show values corresponding to the user’s geographic location, ensure the Filter Look-up Tables by Geographic Location system setting is enabled.
Enter any Header or Footer text to appear on the questionnaire, if desired, as well as any Notes.
If a question response is assigned a score, the Total Score is displayed; to also display individual response scores, select the Display Questionnaire Scores check box.
If you want to include an overall questionnaire score, select the Scoring Type. This can be one of:
the Sum of All questions that have scores
a Custom formula:
1. Click Add Question to Formula and select the question to be part of the formula. It is added to the Score Formula field (e.g. <Q5>).
2. Add an operator to the Score Formula.
3. Repeat as required. So your formula might include all the questions that are defined as subtotals, for an overall questionnaire score, e.g. <Q5>+<Q7>.the Average of all numeric responses, including zeros but excluding null (unanswered) responses.
a Percentage of the total possible score, including zeros but excluding null (unanswered) responses.
By default, any hidden branch questions are excluded from the scoring calculation. If you want to include the scores for these unanswered questions, select Include Hidden Branch Questions in Scoring.
Select the suite inbox (Questionnaire Inbox) where the questionnaire should be directed once completed and submitted.
To link the questionnaire to a module entity to allow a corresponding record to be created and populated with question responses, select the Map to Entity. The entities available are limited to those related to the selected Questionnaire Inbox suite (see Entities That Can Be Mapped to a Questionnaire). Note that you must also map individual questions to entity fields.
Select which suites/modules this questionnaire should be available in. This limits the questionnaire to the appropriate suite menu(s) as well as the online questionnaire link for each suite.
To force the user to provide consent to use the information provided, select the Enforce Consent check box and select the consent question (e.g. “Do you provide consent before responding to the questionnaire?”). These questions are defined in the SingleQuestion look-up table, and must be Yes/No type. The statement and a check box is included on the questionnaire login page.
If the questionnaire may be added as a tab on a custom form layout , select the Flex Fields check box (if added to a custom questionnaire layout). See Creating a Custom Tab.
Click Save.
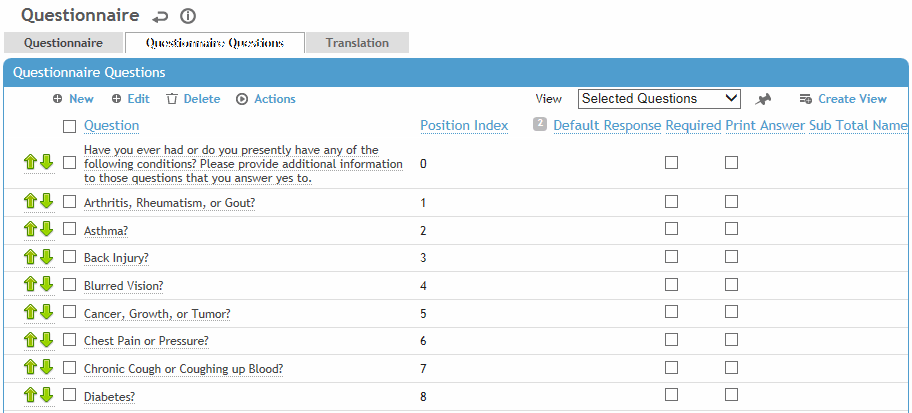
On the Questionnaire Questions tab, identify the questions to be used for this questionnaire; buttons at the bottom allow you to add existing questions from the SingleQuestion look-up table, or create new questions:

To add one or more existing questions, click
 and
select the question(s).
To create a new question, click .
. Select the Question and enter any Default Response, if appropriate. The Questions look-up list is initially limited to those assigned to the category selected on the Questionnaire tab, but you can clear the filter to see all questions.
If you want the Comments field to appear on the Questionnaire Responses form, select Display Comments.
If you do not want this question to be counted in the questionnaire scoring, e.g. if it is a subtotal field, select Exclude from Overall Questionnaire Score. This only applies to Average, Sum, and Percentage scoring types.
If you want to make any Advice or Required Legislation visible to the user (if defined in the SingleQuestion table), select Display Advice or Display Legal Requirement, and if the message should display the text or a URL. If selected, the end user responding to the questionnaire will see an icon that will display the text (or a URL).
If you want to allow (or require) users to attach a document, select the appropriate option in Enable User to Attach Documents.
If this is a Yes/No question that will have further child questions depending on the answer, you can choose to have the child questions display automatically when the parent question is answered (i.e. user will not have to click the + to expand the child questions manually).
To have child questions appear when this (parent) question is answered Yes, select Auto Branch on Response = Yes.
To have child questions appear when this (parent) question is answered No, select Auto Branch on Response = No.
The default layout includes a Neither response; if this is selected, the question will not auto-branch regardless of the user selection.If this is the child question of a parent question, select the Parent Question.
Indicate this question’s Position on the questionnaire, where “0” is first.
Indicate if this is a Required question. Users will not be able to save or submit responses without answering required questions, which will be highlighted. When a blank questionnaire is printed, required fields are indicated with an asterisk. When a questionnaire is exported to Excel, required fields are indicated with highlighting and an asterisk.
To always show all child questions (instead of hiding them with a + sign to expand), select Always Present Expanded (this overrides any Auto Branch setting on Yes/No questions).
You should always use Actions»Reorder questions based on parent/child relation after importing a new questionnaire, modifying parent-child relationship with the questions or moving questions up and down when you have parent-child relationships.
If the questionnaire is mapped to a module entity (see Entities That Can Be Mapped to a Questionnaire) and you want responses to this question to populate a field in a new corresponding module record, select the Map to Entity Field. The options depend on the question type.
If this is a Formula type question, create your formula:
For a simple formula based on one question:
1. Click Add Question to Formula and select the question to be part of the formula. It is added to the Score Formula field (e.g. <Q5>).
2. Add an operator to the Score Formula.
3. Repeat as required.
For example, if the question’s description is “Arm and Wrist Analysis Score - sum of the scores for questions 10 and 11 (CALCULATION:...)” you would add those questions to the formula. They will appear in the Score Formula field and you would just need to identify the operator (+) -- for example, “<Q10>+<Q11>”.To create a formula that calculates the percentage or average scores of specific questions, click Add Function to Formula and select Average or Percentage. The Score Formula field will display “Average(<Q1>,<Q2>)” (or “Percentage(<Q1>,<Q2>)”, as applicable). Modify the formula to include the appropriate questions (e.g. <Q2>, <Q3>, <Q4>).
On the Questionnaire Questions tab, in the Note Configuration section, define if and how the response to this question should appear in notes created when the user chooses the Create Clinic Visit Note action from the questionnaire:
Print Answer |
When selected, either the question or the response will appear as part of the note depending on the question type: • “Instruction” = question • “Date”, “Text”, “Table/Query”, “Numeric”, “Multiple Choice”, or “Multiple Choice Checkbox” = response • “Abnormal/Normal” = response appears if the response is Abnormal. • “Yes/No” = question appears if the response is Yes • “Checkbox” = question followed by a colon and “Yes” appears if the response is True. For example: “Check the box if you approve distribution of this information: Yes” |
Note Line Number |
The line number of the note that the question/response will appear on. Multiple questions/responses can be assigned to the same line. |
Preceding String |
Text to appear before the printed answer (e.g. Blood Pressure:). |
Following String |
Text to appear after the printed answer (e.g. mmHg) |
Concatenation String |
text or symbol that separates question
responses that are on the same line of the note. For example: |
Click Save.
 and select the question(s).
  . See
Step 6 and 7 in