
– Administrator function –
A business rule action is a specific action that is configured to be performed when the business rule it is assigned to is triggered.
To view the business rule actions, in the Administrator menu click Business Rule Actions. The list displays the code, description, rule type, entity, and active status.
Click a code to open an existing action, or click Actions and choose the type of action to create:
To copy a business rule action, open it and choose Actions»Clone.
Business rule actions may be imported into Cority using the Import Utility (see Importing Text or XML Files into Cority Tables). An imported BRA will automatically be linked to its parent BR.
The Business Rule Action Queue displays upcoming or past time-driven business rule actions, as well as any business rules that were forced to run immediately for relevant records (see Monitoring the Business Rule Action Queue).
The message actions allows you to specify a message that will be displayed to the user.
Enter a Code and Description, and enter the Message to display to the user.
The change action allows you to specify an action that will change the value of a property on an entity. You may change it to a static value, the value of another field, or you can assign the result of a subquery to a text or numeric field.
Enter a Code and Description, and select the Entity to apply the change to.
You can define an action to execute bulk changes. For example, for a monthly metrics campaign, when the “Workflow Approval” record for January is approved, a bulk change business rule would then update all of the January “Metrics” records in the campaign to approved. To set this up:
Select the Bulk Change check box. Additional fields appear.
Select the Bulk Change Subquery and enter the Bulk Change Limit (how many records, up to 100, can be changed by this business rule).
To bypass module security when the business rule executes, select the Bypass Security with Bulk Change check box. Even if selected, security cannot be bypassed if the business rule is scheduled.
If you defined a bulk change, the Property to Change field displays a read-only list of properties that will change based on the chosen subquery’s entity.
If you did not define a bulk change, select the Property to Change.
The default Change Type is “Static Value; the New Property Value reflects the selected Property to Change, but you can change it if desired.
To change the property’s value to the value of another field, set the Change Type to “Field Reference”, and then select the other field in Field Reference. If you select an additional value in Field Reference, you are asked if you want to concatenate or sum the values.
Field Reference scenarios:
Set the value of a free text field to another free text field
Set the value of a date (or date/time) field to another date field
Set the value of a time (or date/time) field to another time field
Set the value of a look-up table field to another look-up table field, referencing the same look-up table
A division tree master code can only be saved to another division tree master code (for example, you can not save a division to a location)
Concatenate 2+ text fields (e.g. Employee Name + Employee Number)
Concatenate 2+ text fields with 1+ free text strings (for example, Employee Name + <blank> + Employee Number)
When concatenating, if you want a blank space you must use quotation marks, e.g. treatment date + this is my text + treatment time = treatment date + "this is my text" + treatment time
Where the concatenation is too long for the field, the value is still saved, but it is truncated.
Sum two fields (e.g. work hours + hourly rate)
Sum two fields with a free text number (for example, 4 + work hours + hourly rate)
You can not sum or concatenate any field that is not text or a number or a decimal (for example, no date fields)
To assign the result of a subquery to a text or numeric field, set the Change Type to “Query” (only available if Property to Change is a text, number, date or time field), then select the Query.
When the business rule is triggered, the Property to Change field will be assigned the value from cell 1 of the selected subquery if the field types match. If cell 1 is empty, the Property to Change will not be changed by the business rule.
If the Execution Type is “Scheduled”, you can set the action to recur: click the “Not Set” link next to Recurrence and define the frequency and conditions.
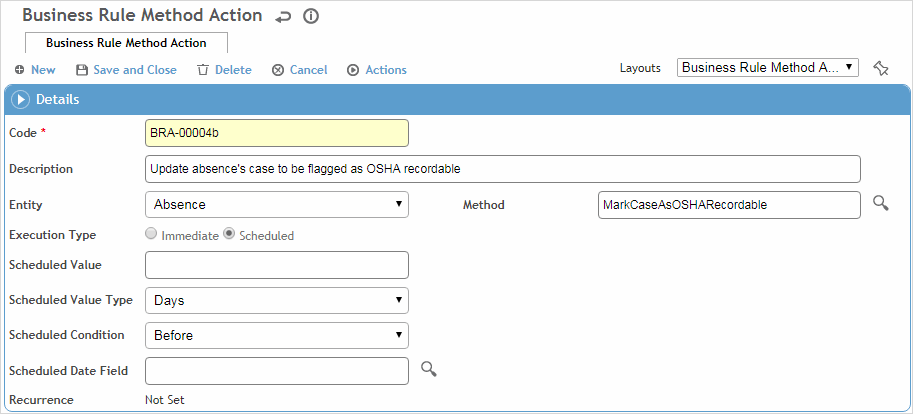
The method action allows you to specify an action that will execute a method in the service for the specified entity. Method actions are used to execute more complex actions that are not part of generic functionality of business rule actions. In most cases you will not need to use method actions. Also, you cannot create new methods to be used with a method action.
Method actions should not be used unless you are familiar and comfortable with the associated functionality. If you are not sure of how to use a particular method action, contact Cority Customer Support for assistance.
Enter a Code and Description. Select the Entity to apply the method action. Select the Method to execute in the service.
If the Execution Type is “Scheduled”, you can set the action to recur: click the “Not Set” link next to Recurrence and define the frequency and conditions.
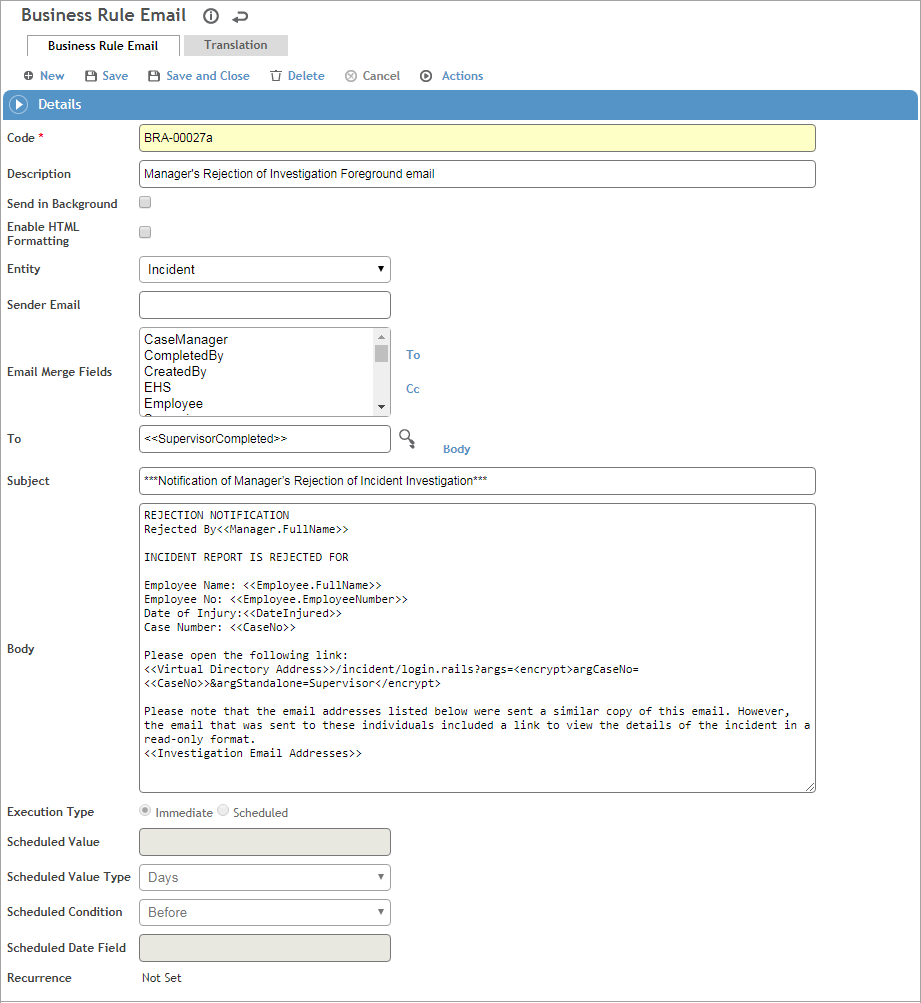
The email action allows you to configure an email to be sent out by Cority.
Enter a Code and Description.
If you want the email to be sent in the background by the system without any user interaction, select Send in Background. If this is not selected, the email will be displayed to the user so that he/she can make any desired modifications before the email is sent.
To turn on a toolbar with formatting options above the Body section, select Enable HTML Formatting.
Select the Entity to apply the email action. In Sender Email, enter a name to specify who the email is from.
Email Merge Fields allow you to select from employees, users or groups/teams. If you select a group or team field, the email will be sent to each active employee in that group or team.
Enter the Subject of the email, and define the Body of the email. To include merge fields in the subject line or the body which will be dynamically populated with data from the record, select the Merge Field and click Subject or Body as appropriate. If the Enable HTML Formatting check box is selected, use the toolbar options to format the body of the email as desired. If the check box is not selected, the email will be sent as plain text.
If Send in Background is selected:
You can schedule the email to be sent in relation to a specific date field in the record: select the Execution Type as “Scheduled” and define the schedule parameters. For example, send an email reminder 10 days before the next maintenance date. When a scheduled email action is triggered, it is added to the Business Rule Action Queue, and emails can be viewed in the Email Log (Viewing the Email Log).
You can specify a letter or a PDF Form (but not both) to be included as an attachment:
The Letter Attachments field allows you to select from LettersTemplates that have no merge tables, or that have a merge table that matches the Entity. The letter's merge fields will be populated with the appropriate information from the record that triggered the BR. The letter will be sent as a PDF attachment, and will be listed on the Letters tab of the record that triggered the BR.
The PDF Form Attachment field allows you to choose from PDFForms for which the linked module matches the Entity. Any mapped fields in the PDF Form will display the values from the record that triggered the BR. The form will be sent as a PDF attachment, and will be listed on the Forms tab of the record that triggered the BR. If the PDF Form is updated after it has been emailed, the recipient(s) will not see the updated version; they will see the version in effect at the time it was sent.
If the attachment includes a subquery, the subquery data will display in the letter/form. The letter/form will only display the subquery data to which the user who triggered the BR has access; the recipient(s) will be able to view that subquery data regardless of their module security.
If the Execution Type is “Scheduled”, you can set the action to recur: click the “Not Set” link next to Recurrence and define the frequency and conditions. The email action will recur according to that pattern as long as the BR still applies to the record.
Language: For emails that are sent:
- to user email merge fields: the email will be sent in the language specified for the user (recipient) in system settings
- to employee email merge fields: the email will be sent in the language specified on the employee’s demographics record; if the record does not have a language specified, the email will be sent in English
- to an email address directly: the email will be sent in the language specified for the employee (on their demographics record) or user (in system settings) associated with that email address. If the email address exists for both an employee and a user, the email will be sent in the language specified for the employee. If the email address is not associated with an employee or user in Cority, the email will be sent in English.
If you modify a foreground email before sending it, the email will be sent in English, regardless of the recipient's language.
For email distribution lists, emails will be sent in each recipient's respective language as outlined above.
You can set up a business rule action that sends an SMS message. You must purchase a Twilio subscription and enter the account ID and authentication token in the “SMS Twilio Account SID” and “SMS Twilio Auth Token” system settings.
The Business Rule SMS layout is the same as for the Email action described above, with the addition of a Sender Phone Number field. All SMS messages must be sent from a sender phone number purchased from Twilio.
If the body of the message exceeds the character limit (e.g. 160 characters, but this number may vary depending on the alphabet used), you will be prompted to confirm that it may be broken into multiple messages. SMS messages sent by Cority can be viewed in the SMS Log (Viewing the SMS Log).
If you create a distribution list of phone numbers using a Report Writer query (see Working with Ad Hoc Reports), a phone number column must be included. If the first column is Employee Number or Employee Cell Phone Number, the employee's cell phone number will be used. If the first column is Login Name or User Phone Number, the user's phone number will be used.
The in-app notification action allows you to specify a notification that will be displayed to myCority app users when an event occurs in Cority. The layout is similar to Email Action above. Notifications sent to myCority can be viewed in the In-App Notification Log (see Viewing the In-App Notification Log).
You can set up a business rule action that sends an API call to another system. The action will create or update records based on what you put in the Response Body; for example, if you expect “employee number” to be in the response, include a merge field in the Response Body that will map back to a created or updated employee record in Cority.
API actions should not be used unless you are familiar and comfortable with the associated functionality. The maximum number of daily Cority API requests is currently 1000, subject to change. Contact Cority Customer Support for assistance.
If the API Response Transaction Type is “Create Record”, the Merge Fields list provides the sublist fields for the selected entity. When you add one of these sublist fields to the Response Body, the system will create as many new records as are indicated by the API response.
The Body text must be formatted according to the selected Content Type.
To include a merge field in the Header, Body or Response Body section which will be dynamically populated with data from the record, select the Merge Field and click Header, Body or Response Body as appropriate.
You can encrypt the API URL, Header, and Body values using the <EncryptOnDisplay></EncryptOnDisplay> tags. For example, if you enter <EncryptOnDisplay>www.website.com</EncryptOnDisplay> in the API URL field, the URL text will become encrypted.
If the Execution Type is “Scheduled”, you can set the action to recur: click the “Not Set” link next to Recurrence and define the frequency and conditions.
Every API call that was made by Cority can be viewed in the API Log (see Viewing the API Log).
The Business Rule Action Queue displays upcoming or past time-driven business rule actions, as well as any business rules that were forced to run immediately for relevant records.
In the Administrator menu click Business Rule Action Queue. Here you can:
Monitor upcoming actions or select the History view to view past actions.
Cancel selected upcoming actions (select and choose Actions»Cancel Actions).
Click a record number link to open the record that the action relates to.