Importing Text or XML Files into Cority Tables
– Administrator function –
The Import Utility imports CSV text files and XML files into Cority look-up tables and data tables (including site security definitions). The import form allows you to determine how and which data is imported. Each file may contain up to 2000 records.
About CSV Text Files
-
It is not necessary to enclose values in (e.g. “John”, “Doe”, “Aug 10, 1984”); however, if the data contains commas as with the date field example, then it must be enclosed in quotes.
-
If the file includes special characters (e.g. words that contain diacritical marks), use UTF-8 encoding.
About XML Files
The XML format supported in the Generic Import Utility is XML Data file, not XML spreadsheet file.
When you import an XML file, the import utility reads the import format from the XML file, not from the import utility template, but the field names in the XML file must match the field names shown in the import utility. For example, you may have saved an employee import template with 30 fields selected, but you can import an XML file that has only three of those fields defined (e.g. EmployeeNo, LastName, FirstName).
About Importing Site Security Definitions
When importing into the Site Security table, values are required for the Role and GDDLOFB fields. If the Automatically insert non-existing look-up table values check box is selected and a role specified in the import file does not exist in Cority, the system will create the new role. The Site Security table provides the following optional fields: Allow Read, Allow Insert, Allow Update, Allow Delete, and Role Description. After import, the system will create the Site Security record(s) and associate each with the role specified.
Importing the File
-
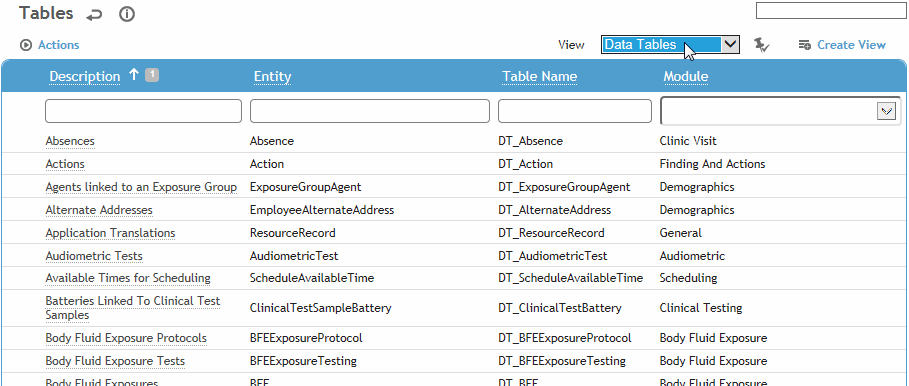
In the Administrator menu, click Import Utility.
-
Select the view (Data Tables or Look-up Tables) to display the tables that can be imported into.
-
Select the table you are importing into.
-
Select the XML File check box to have the Browse button only show XML files. If you do not select the XML check box, but browse and choose an XML file, the import utility will still use the XML logic (i.e. ignore the import utility template and read the format from the XML file.
-
Click Browse to retrieve the file.
-
Indicate if existing records should be updated, if look-up table values should be inserted automatically, and if the import file contains a header row (so that the import utility will ignore that row). If you are importing date fields, select the Date Format.
-
If you are importing into the Treemaster look-up table, select the tree you are importing into.
-
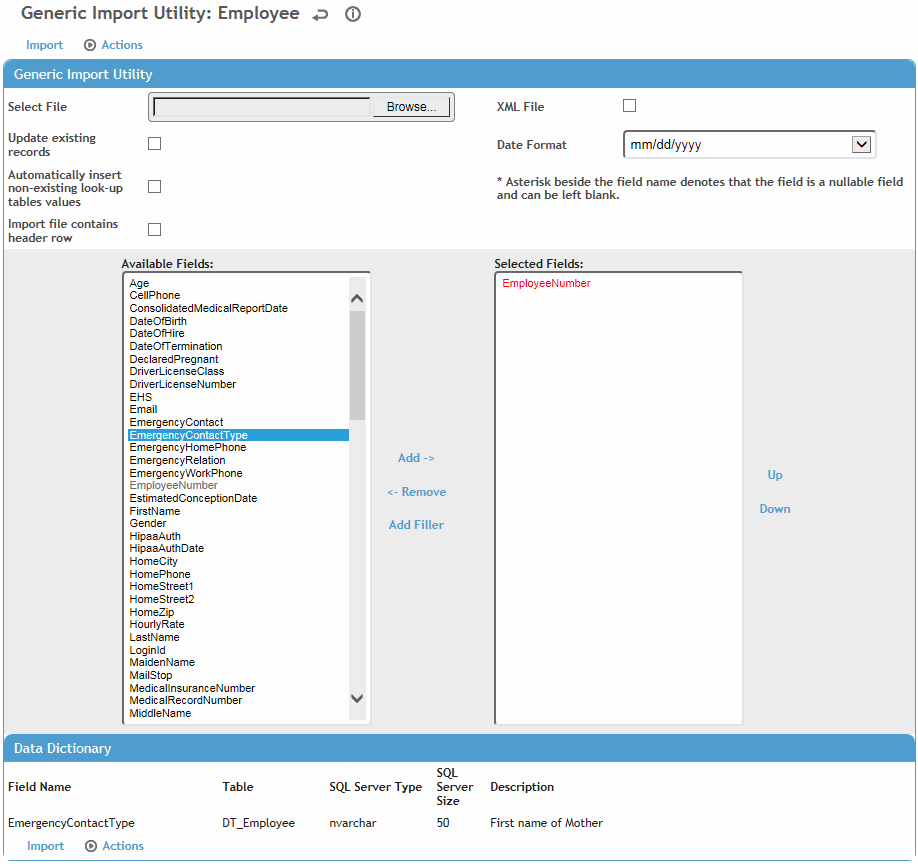
All fields in the table are listed in the Available Fields list. Select the fields that you are importing into: select a field in the Available Fields list, and click Add to add it to the Selected Fields list.
There may be one or more fields already in the Selected Fields list, shown in red text. These are default fields that comprise of the unique key for that table. In the case of the DT_Employee table shown below, the EmployeeNumber is the one field that makes up the unique key. These unique key fields must be populated in the import file, and it cannot be removed from the Selected Fields list. In some scenarios, a field of the unique key can be left blank. In this scenario, an asterisk * will be specified beside the field indicating that it can be blank.
Refer to the Data Dictionary values for a selected field at the bottom of the form to see the character limits. Imported values that exceed this limit may be truncated or result in an error.
If you are importing a finding, you can use the Action fields to import child records and automatically link them to the parent finding. If you are importing child fields into a parent table, you must select the corresponding ImportGroupingId field, and denote the parent/child relationships in the import file.
-
Use the buttons to move the selected fields up or down as required to match the order they are listed in the file.
-
The number of selected fields must match the number of fields in the file. If there are fields in the file that do not have an equivalent/corresponding field in Cority, click Add Filler to create the necessary number of placeholder fields so the import will work. Filler fields are not stored in the application.
If you may be importing these fields again from another file, choose Actions»Save Format so that you don’t have to define your options and fields again.
To create a spreadsheet (.csv format) with column titles that correspond to the fields in the Selected Fields list, choose Actions»Export Template.
-
When you are finished, click Import.
What Happens Next?
The import utility checks all tables that are related to the main import table to ensure that the codes/foreign keys exist in the related tables. If the related table is a look-up table, then usually the code will be the field which needs to be included in the import text field.
Example: The FindingType table may have the following entries:
“ENV5”, “A dig permit has not been completed for the worksite”
“ENV6”, “Workers in the area are not following HAZWOPER work procedures”
The codes in this case are ENV5 and ENV6 and these are what need to be included in the import file. If the code does not exist in the FindingType table, it will be added if you have selected Automatically insert non-existing look-up table values. If this check box is not selected, the record will be rejected.
The import utility adds new records to the database and updates existing records if the corresponding check box is selected. If the check box is not selected and the record already exists, the record will be rejected with a message indicating that it is a duplicate.
When importing new GDDLOFB tree values, if the tree node is not in the database, it will be attached to the root of the specified GDDLOFB tree. The administrator can later move the node to the desired node/location (see Setting Up An Organizational Tree.
When the import is complete, you will receive a message indicating the results of the import: i.e. how many records were added to the database, and how many records were rejected or updated. It will also indicate the number of records added to the log file which is the summation of the records added, rejected, and updated.
To view details of why records were rejected, choose Actions»Process Status and Log (for more information, see Viewing Import Logs).

