
– Administrator function –
In addition to providing security by controlling access to modules and actions, Cority provides additional row level security that is designed for multiple sites that are using the application while the data is located on a single server. In this scenario, each site may need exclusive access to update its own records. Sites may also need to prevent other sites from updating their records.
To provide this kind of security, Cority uses roles similar to the functional roles set up to handle permissions at module (or action) level (see Setting Up Roles). These site roles determine which sites users have access to. A role should be created for every site where the data needs to be kept separate. All users in that site will be members of that role.
Site security uses the organization tree (see Setting Up An Organizational Tree) to identify the demographic area (e.g. Geographic Location, Department, Division, Location, Organization, Floor Area, Building) and Health Center. For each site role, different combinations of these demographic areas can be defined. For example, the site role COR_TORONTO has full rights to records exclusive to Toronto’s Accounting and Marketing departments. You can use different combinations of the fields to configure different site roles.
With the two basic levels of security in mind, each user should be assigned both of the following:
at least one functional role, such as COR_CASE, that determines which actions they can execute
at least one site role, such as COR_TORONTO, that determines which rows of data in the tables they can view
For example, user John Smith belongs to the Case Management team and is allowed only data restricted to the Toronto office. In this case, you should assign John the functional role COR_CASE and the site role COR_TORONTO.
Functional roles should be set up before site roles.
In cases where site security is not required and users do not need exclusive access to data for their site, you should create a generic site role such as COR_ALL_SITES and grant it to all users before they view or create records in the system.
When a user navigates to a list or opens a record from the list, site security logic checks if the user's role has appropriate rights to see the record(s). It will compare the record's GDDLOFB and HC fields to be one of the following:
an exact match of the role's site security setup, OR
one of the parents on the path of the role's security setup, OR
one of the children of the role's site security setup.
Site security extends to sublists; in other words, users who are prohibited from viewing a certain type of record will also be prohibited from viewing any of its child records.
In case of medical site security, it will also compare GDDLOFB and HC of the record's employee to the role's site security setup, in addition to the above.
When a user saves/modifies/deletes a record(s), site security logic checks if the user's role has appropriate rights to manipulate the record(s). It will compare record's GDDLOFB and HC fields to be one of the following:
an exact match of the role's site security setup, OR
one of the children of the role's site security setup.
In the Administrator menu, click Site Security.
Click New.
Site security roles may be imported into Cority using the Import Utility (see Importing Text or XML Files into Cority Tables). For each record, values are required for the Role and GDDLOFB fields. If the Automatically insert non-existing look-up table values check box is selected and a role specified in the import file does not exist in Cority, the system will create the new role.
Select the Role that you want to define site security for. This may be a role that was only created for site security purposes (i.e. not a functional role).
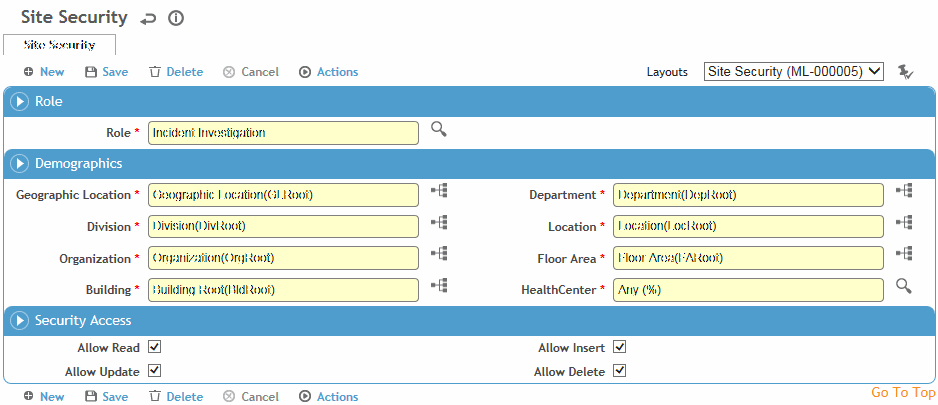
For each demographic field, select the tree level you want to give access to. Users with this role will have access to that level in the tree along with all branches and nodes below that level.
Select the health center that this role is allowed to access, or select “Any” to allow access to all health centers.
Select the access permitted for this role at the selected demographic locations (i.e. Read, Update, Insert, or Delete data).
Click Save. The site role is now available to be granted to users (see Setting Up Users).